
Who doesn’t like English Toffee? I don’t think I’ve met anyone who doesn’t like it…in fact, most people love it! This Christmas season I bought several boxes of assorted chocolates at See’s Candy at my husband’s request. He wanted to share with some folks he sees regularly and I thought it was a great idea. While perusing the See’s discount store in town, I happened upon Victorian English Toffee and picked up a box. In the past, this would have been a perfect gift for my mom. In fact, last year, I picked up a tin of English Toffee at Crate & Barrel during the holiday season and it was one of the gifts I gave to my mom. However, this year, I opened the box and once I cracked the big toffee bar, it was a goner. As I worked my way through the box (at intervals of course), I thought I would share a little with Mor, my husband. Well, within hours it was gone…all gone. Although I wanted to buy more, I knew it was an over the top splurge from a sugar, fat, and calorie standpoint so I refrained. However, a friend at work gave me a Christmas gift of homemade … yes …. you got it …. English Toffee! I put it out on Christmas Day with other candy treats only to find that my husband put a few choice pieces back in the bag to savor later!
Since the toffee was such a big hit with both of us, I decided to try my hand at making English Toffee as a homemade treat. Years ago, I tried to make it and burned the butter/sugar mixture and decided to stick with peanut brittle rather than risk another burned attempt at the toffee. Candy making can be very tricky and I had gotten the peanut brittle down pat (another of my Mom’s favorites). My Aunt Elaine used to make the toffee at Christmas and her recipe called for brown sugar and butter and it seemed easy enough to make but when I tried, the mixture fizzled out so to speak. I figured I would find a recipe on Pinterest that would deliver and put in a search for English Toffee. What I found was such a wide array of toffee recipes it was overwhelming. However, reviewing so many recipes allowed me to get a real sense of what would make a good and easy toffee and ultimately I pieced together ingredients and methods that resulted in my successful attempt at making English Toffee.
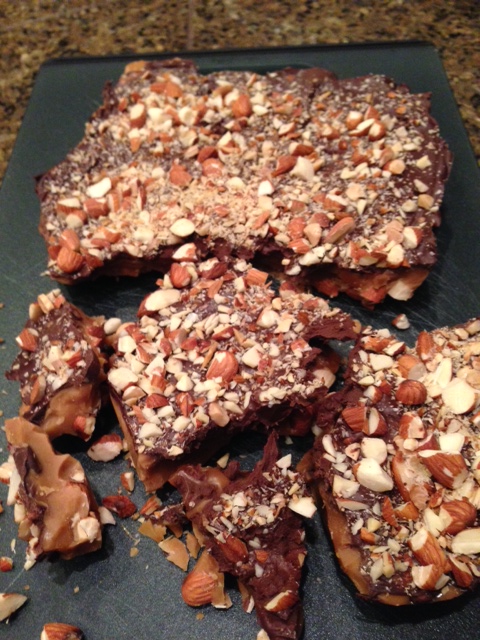
I think nuts are a must for English Toffee and although I found walnuts, pecans, and almonds used in the various recipes, I think almonds really complement the toffee and that is what I settled on. Some recipes add the nuts to the sugar and butter combination (toward the end of the cooking phase) while others don’t add nuts to the hard toffee candy at all. I like almonds in the toffee and actually layered them in the pan and poured the toffee over the nuts which worked out very well. All recipes called for chocolate and most suggested either milk chocolate or semi-sweet chocolate. Again, in my opinion, milk chocolate is the way to go. I think the semi-sweet chocolate flavor takes away from the caramelized flavor of the toffee and the milk chocolate is chocolatey but mild enough to complement the toffee.
So here are the ingredients (and surprise … no corn syrup in this one)!
1 1/4 to 2 cups raw whole almonds (set aside at least 1/4 cup for topping)
1 cup butter (2 cubes of unsalted butter)
1 cup white granulated sugar
1/4 tsp salt
1/2 to 1 tsp vanilla
1 to 1 1/2 cups milk chocolate chips for topping
1/4 to 1/2 cup finely chopped almonds for topping
Method: Some recipes called for the use of a candy thermometer while others did not. I decided to try my luck at not using the thermometer even though I do use a candy thermometer when I make peanut brittle. The recipes that did not use a thermometer would use the color of the sugar butter mixture as an indication of when the toffee was done. I know how tricky this is from my first attempt when my toffee went from a pretty amber to burned brown in a matter of seconds. So for this recipe, no thermometer!
Directions: I use an 8×8 size pan so the toffee is fairly thick. You can use a bigger pan, such as a 9×13, which will result in a thinner toffee. It is really about preference. I line the pan with foil to make clean-up easy. Take the raw whole almonds and roast them at 350 degrees for 10 to 12 minutes. The reason I have such a range for the amount of almonds in this recipe is because I really like almonds and think the more the better. However, that is a matter of taste and really you decide what works for you. Once the almonds are roasted, take at least a cup and chop them roughly. I like leaving big pieces of almond and in some cases, whole almonds for the toffee. This works well if you use a smaller pan so the toffee is thick. If you like a thinner slab of toffee, you’ll want to chop the nuts into smaller pieces. Also the nuts that have been set aside for the topping should be finely chopped.
When you are ready to make the toffee, that must be your complete focus. In other words, no multi-tasking at this phase of the recipe. In a medium-sized sauce pan, add the butter (cut into small pieces), the sugar, the salt, and the vanilla. Begin stirring the mixture over medium heat. As the butter melts, I change from a wooden spoon to a whisk which I think is a better tool for the constant stirring which keeps the mixture from burning. I set the timer for 10 minutes to help me keep a focus on how much time I’ve been stirring! At this point, it is just a matter of constantly stirring the mixture. Occasionally I would lift the pan off the flame for a moment. I will tell you that your arm will get very tired. I switched from right to left hand several times and that is why it is important to set the timer so you have a frame of reference! At about 8 minutes or so, the color of the candy begins to darken and caramelize and this is where you need to watch it closely. I turned the heat down slightly and didn’t rush this part of the process. Some of the recipes I saw on Pinterest had pictures of the toffee that were much to light in color. You really want to get a nice honey brown color to the toffee. It took me almost 12 minutes to get to that point and based on the color, I was done.
I immediately poured the toffee over the nuts lining the pan. After about 3 to 5 minutes, I sprinkled the chocolate chips on the toffee slab and waited several minutes to smooth the melted chips over the candy. I then sprinkled the finely chopped nuts over the chocolate. Because I made my toffee thicker, it took a little more time to harden. After about an hour on the kitchen counter, I put it in the refrigerator. About an hour later it was ready to eat!

